
Your app must comply with GDPR (General Data Protection Regulation) even if you are not located in the EU. It is enough that you have European users. In this blog post, I’ll describe eight ways to improve the GDPR compliance for your web app. Implementing the following techniques by itself will not make your app GDPR compliant. However, if you don’t have them in place, it means that there’s a severe loophole in your app’s security and compliance.
According to GDPR an encrypted storage and transfer medium is always preferred. In case of a security breach taking steps to encrypt your data might provide you an additional legal cover. You’ll be able to prove that you did take measures to protect sensitive data.
“In addition, if there is a data breach, the authorities must positively consider the use of encryption in their decision on whether and what amount a fine is imposed as per Art. 83(2)(c) of the GDPR.”
Let’s start with discussing some relatively staightforward but easy to miss ways to encrypt data in AWS.
Disclaimer: I am not a lawyer, and this article does not constitute legal advice.
1. Encrypt S3 buckets
All the content of your S3 buckets should be encrypted. You could encrypt it on the client-side before upload, but it would force you to manage the encryption keys yourself. I recommend using the default SSE-S3 server-side encryption because it is the simplest to implement.
To enable it go to S3 > your-bucket > Properties and select Enabled for Server-side encryption and Amazon S3 key (SSE-S3) for Encryption key type.
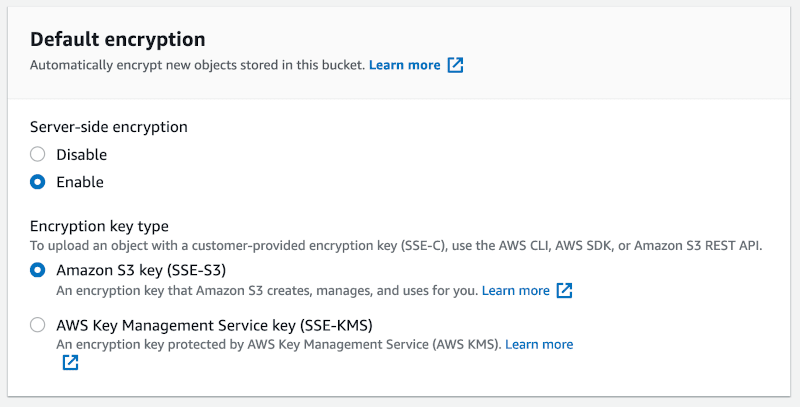
With these settings in place, all the new objects will automatically get encrypted during the upload.
How to encrypt contents of an unencrypted S3 bucket
Enabling default encryption does not automatically encrypt the already uploaded objects. You’ll have to encrypt them manually. You can do it using AWS CLI. I usually make a backup copy of my buckets before doing any data migrations. You can sync the contents of your current bucket to the new one by running these commands:
aws s3 mb s3://backup-bucket --region us-east-1
aws s3 sync s3://your-bucket s3://backup-bucket
With the contents of your bucket safely backed up, you can now perform the encryption:
aws s3 cp s3://your-bucket s3://your-bucket --sse AES256 --recursiveThis command overwrites all the files from the bucket with their encrypted copies. Remember that it’ll also eradicate files metadata. Make sure to test on staging if that’s an issue before starting the production dataset migration.
A handy trick for performing more time-consuming operations via AWS CLI is to run the script from an EC2 instance provisioned in the same region as your target API. API calls will then travel across the internal AWS network instead of the public internet. For my test bucket, the command was consistently over 2X faster when executed from the EC2.


If you have a massive S3 bucket that you’ll be unable to migrate in one go, you could use S3 Inventory first to generate the list of all its objects. Later you can use a custom bash script that will gradually migrate unencrypted files.
2. Enable default encryption for EBS volumes
Similar to the case of S3 buckets, you must make sure that your EBS volumes are encrypted. Whenever you create a new EBS volume, you can choose if you want to encrypt it or not. Make sure always to choose the default aws/ebs encryption when adding a new volume.
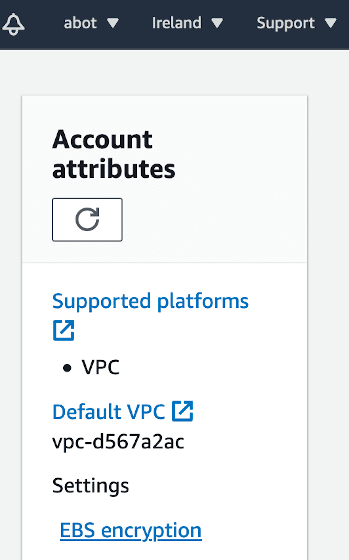
Even a better idea is to enable automatic EBS encryption by default. Go to EC2 > Account attributes > EBS Encryption to enable it. This is a regional setting, so make sure to select the correct region before.
How to encrypt an unencrypted EBS volume
If you’ve created an unencrypted volume before, you should migrate it to an encrypted format. To do that, you must first create a snapshot.
Go to EC2 > Elastic Block Store > Volumes and select Actions > Create snapshot for your volume. Give it any meaningful name and click Create snapshot. Go to EC2 > Elastic Block Store > Snapshots, and when it’s ready, select Actions > Copy. Make sure to select Encrypt this snapshot using default aws/ebs encryption. It is advised to stop the underlying EC2 instance before creating the snapshot to ensure data integrity. Just watch out because the public and private IPs will change if you do it.
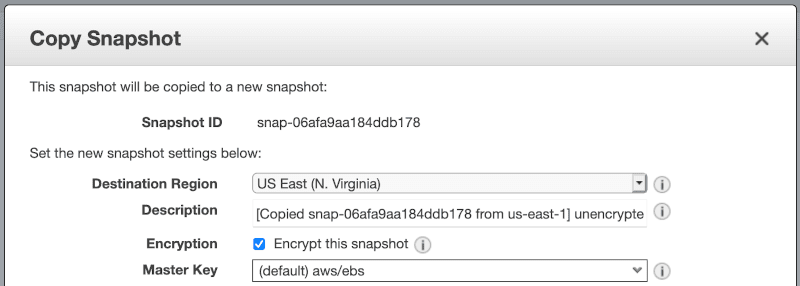
You can now create a new encrypted volume from the snapshot. If your EC2 instance is in a stopped state, you can detach an old unencrypted volume and attach a new encrypted one.
3. Enforce encrypted traffic for the RDS database
AWS RDS is a cloud-managed database solution. If you’re using it for your web app, you need to make sure to tweak some insecure default settings.
One mistake you can make when using RDS is not enforcing an encrypted database connection. It’s critical to do it if your database can be publicly accessible outside of the AWS datacenter. Otherwise, any misconfigured client could transfer all your data in plaintext across the public internet. Even if clients can only access your database from the private AWS subnet, you should also enable encryption for legal reasons. According to GDPR rules, both data in transit and at rest should be encrypted.
You can check yourself if your database allows unencrypted traffic by running this command:
psql "postgres://rds_user:[email protected]:5432/your_database?sslmode=disable"Warning: running this command will expose your database access credentials on the public internet. If you do it, please remember to change your password before reusing the same database for production purposes. You can safely run this command from an EC2 instance if it connects to the database across a private subnet.
The correct outcome is the similar error log:
psql: error: could not connect to server:
FATAL: no pg_hba.conf entry for host "rds-host.com",
user "postgres", database "your_database", SSL off
If you managed to connect, your configuration is insecure, and you must fix it by adding a custom Parameter group. Go to RDS > Parameter groups > Create parameter group. Choose the correct PostgreSQL version for the Parameter group family and give the new parameter group any meaningful name.
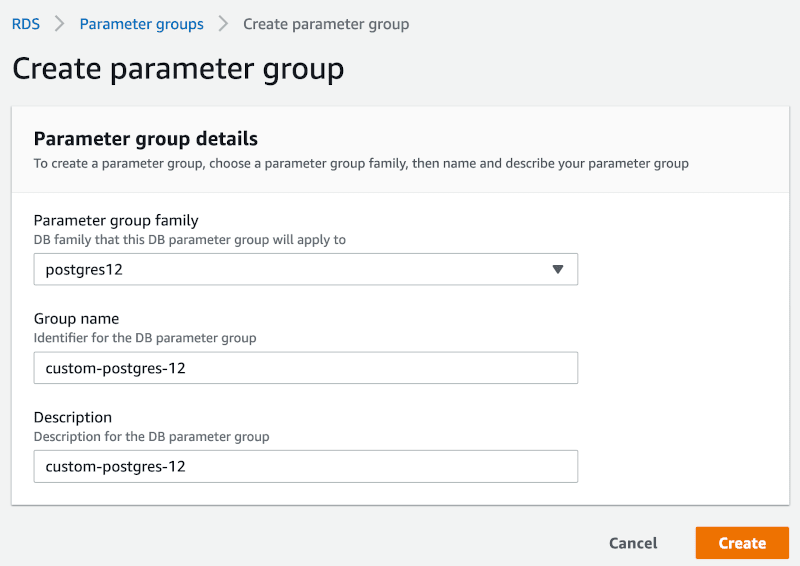
When it’s created, enter the edit mode for parameter group and set the value 1 for rds.force_ssl.

Now save the changes, go to RDS > Databases > your-database > Modify. Expand Additional configuration and select your new parameter group. Click Continue, and on the next screen, make sure to choose to apply changes Immediately.
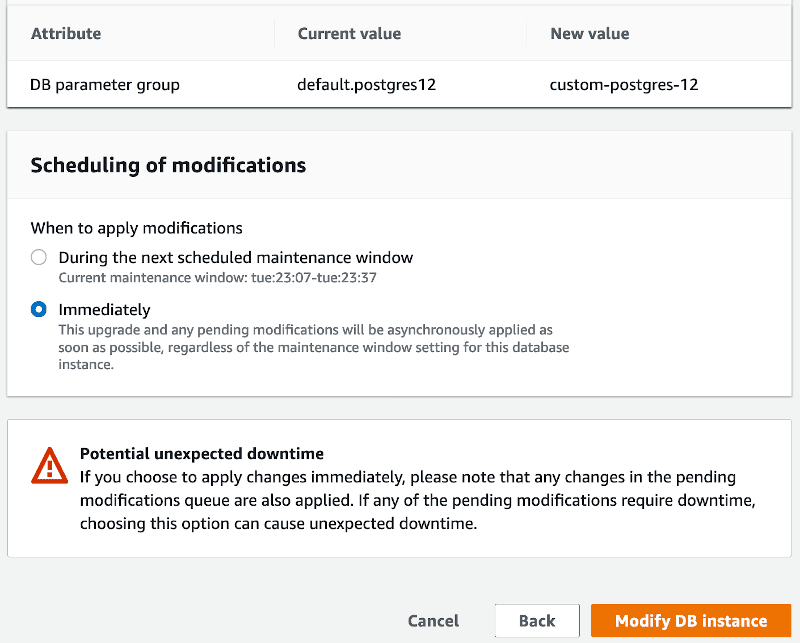
Once the settings are applied, click Actions > Reboot. Let’s now try to connect to our database without SSL encryption:
psql "postgres://rds_user:[email protected]:5432/your_database?sslmode=disable"you should see the following error:
psql: error: could not connect to server:
FATAL: no pg_hba.conf entry for host "rds-host.com",
user "postgres", database "your_database", SSL off
It means that our custom settings have been applied, and the secure SSL connection is now enforced.
4. Encrypt RDS database
Another setting that’s easy to overlook is configuring a database as encrypted during creation. Make sure to check the Enable encryption checkbox and choose the default aws/rds key.

If you’re already using an unencrypted database you can fix it by creating a snapshot. In your database Actions select Take snapshot. When it’s ready from the snapshot Actions, select Copy snapshot and mark the new copy as encrypted.

When the snapshot is ready, you can select Restore snapshot from its Actions and provision a new encrypted database.
The downside of this technique is that taking the snapshot of a more massive database and restoring it will take some time. To ensure data consistency, you must disable new writes before starting this process. Make sure to plan this maintenance in advance and outiside of the peak traffic hours.
Also, remember that encryption exerts additional pressure on the database engine. You’ll have to watch out for spiking CPU utilization if you’re using the cheapest t3.micro instance type.
5. Don’t allow plain HTTP traffic
Another way to improve the security of your application is to only accept encrypted HTTPS traffic. Details of your frontend infrastructure are behind the scope of this tutorial, but your backend servers should be behind some proxy or a load balancer.
I can recommend Cloudflare because it offers additional security and CDN benefits. Alternatively, you could put your EC2 servers behind the Elastic Load Balancer.
Both tools offer a way to redirect any HTTP request to HTTPS. It means that the security group of your EC2 instances should only accept port 443 HTTPS traffic. Port 80 should be closed to narrow the scope of possible attacks and make sure that the data in transit is always encrypted.
Additionally, adding an HSTS (HTTP Strict Transport Security) header protects your website from a range of attacks by enforcing SSL connection for all the clients. You can submit your website to HSTS Preload List to redirect visitors to the HTTPS version by default, even if they did not yet visit your website before.
Use the following NGINX directive to add the HSTS header:
add_header Strict-Transport-Security "max-age=31536000; includeSubDomains";Just remember that adding the HSTS header is a one-way trip and cannot be reverted.
6. Enforce 2FA for root and IAM users
According to GDPR, a company is obliged to implement technical measures to ensure its data security. Enforcing multi-factor authentication for all your IAM users will eliminate a whole range of account takeover attacks.
New AWS accounts don’t have multi-factor authentication enabled by default. To enable 2FA for your account, click Account name > My Security Credentials > Multi-factor authentication (MFA)
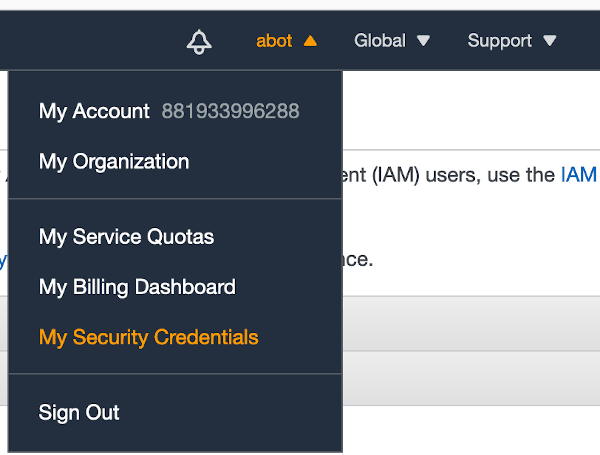
The simplest solution is to choose a Virtual MFA device. Various tools are compatible with this option; I keep all of my 2FA codes in 1Password. Google Authenticator app is a free and popular solution as well.
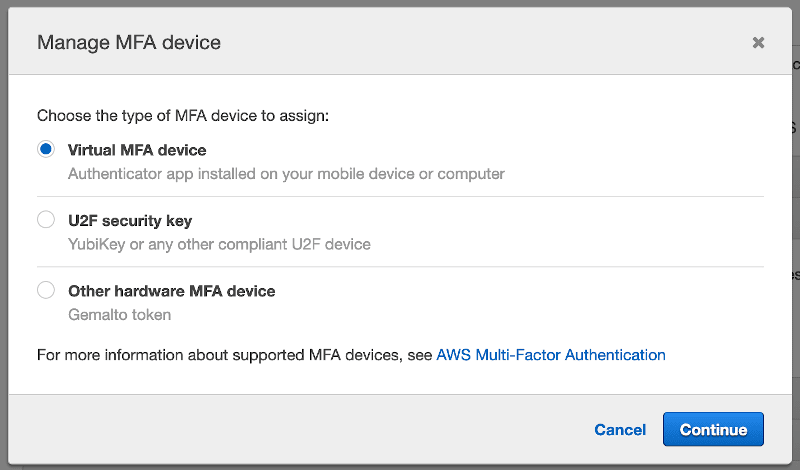
To configure the tool of your choice, you’ll need to scan the QR code and input two consecutive one-time codes.
Please refer to AWS documentation if you encounter any issues. For a detailed tutorial on how to enforce MFA for all IAM users you can check out this link.
7. Enable an immutable Cloudtrail audit log
GDPR rules encourage adding an audit log about who accessed which personal data. Adding full auditing capabilities to your application could be a complex process. However, you can lay a foundation by enabling a global Cloudtrail audit log.
Cloudtrail records all the interactions with the AWS API. It could be invaluable in case of a breach for auditing what exactly happened in your account. This is a global setting, so you only need to enable it once, and events from all the AWS regions will be stored in a single S3 bucket. To enable it go to Cloudtrail and select Create a trail. You should also edit your trail and enable Log file validation so that you’ll be able to check if someone tempered with the logs.
Optionally, you could configure your audit logs to be stored in an S3 bucket with a Compliance Object Lock enabled. It will make them practically immutable even by a user with root admin access. If you’re serious about auditing the access to your AWS account, you should consider this option. Otherwise, an attacker could theoretically remove all the logs to obfuscate his actions.
8. Use the principle of least privilege for IAM policies
To adhere to the GDPR, companies need to practice the principle of least privilege. Fine-tuning your IAM policies is not always straightforward, especially for more obscure parts of the AWS stack. AWS Policy Generator is a handy tool that can help you generate custom IAM policies.
A good starting point to check if you are granting just enough permissions is to validate that you’re not using any AdministratorAccess or AmazonS3FullAccess policies. They are really easy to misuse and you should never grant them to your application processes.
One exception for using these policies is one-off maintenance tasks performed using AWS CLI. I usually keep a single power user, but his access credentials are deactivated when the task is over.
You can check out this blog post for more info on why using too permissive policies for S3 access is a serious security loophole.
Summary
Full GDPR compliance is a bottomless pit full of legal complexities. I hope that the above tips will be a starting point for adding proper protection for your users’ data. But remember that implementing those tips does not mean that your app is GDPR compliant. Always consult a lawyer specializing in GDPR to make sure that your compliance level is adequate.
