A full Ethereum node is often necessary for development purposes or if you don’t want to rely on 3rd parties like Infura for blockchain access. Compared to the “Ethereum killers”, running a full ETH node is relatively affordable and requires only a basic dev ops skillset. In this blog post, I’ll describe a step-by-step process to setup a full Geth node on AWS EC2. We’ll discuss hardware costs and configure HTTPS NGNIX proxy for connecting Metamask wallet to your proprietary node. We will also configure proxying for secure WSS WebSockets. This tutorial covers Geth version 1.13.8, so it applies to ETH 2.0 protocol version after the Merge. I won’t delve into details but focus on the necessary minimum to get your node up and running quickly.
Only the first part is specific to AWS. The rest of the steps will be identical on any other Cloud VPS provider or proprietary VPS server running Ubuntu.
Do I need 32 ETH to run full node after the Merge?
Let’s start by addressing this common misconception. After the merge locking, 32 units of Ether is necessary to run a full block producer node. It means that by staking Ether, you help increase the Ethereum network security by taking part in a new proof of stake consensus mechanism. Your full staking node would be randomly chosen to append a new block to the blockchain and receive corresponding rewards or optional MEV tips.
Configuring a full non-staking node is similar to the block producer node, with the critical difference that you don’t need to own any Ether to run it. While non-staking full nodes don’t produce new blocks, they still help increase the network’s security by validating the correctness of received blocks. You can also use your proprietary full node to interact with the blockchain in a fully permissionless and uncensorable way. Centralized blockchain gateways like Infura or Alchemy currently disallow interactions with certain blacklisted smart contracts. Running your node is also necessary for more advanced blockchain use cases like running MEV arbitrage bots.
We have a lot of ground to cover, so let’s get started!
Spinning up an EC2 instance
Start with provisioning a new EC2 instance. Go to EC2 > Instances > Launch instances. Select Ubuntu Server 20.04 LTS (HVM), SSD Volume Type AMI, architecture 64-bit (x86). For Instance type, choose the m5.xlarge (16 GiB RAM, 4 vCPUs). It will cost ∼$150/month.
Please remember that AWS is one of the more expensive cloud providers. You can provision a similar VPS instance with Hetzner Cloud for ~$30/month, i.e. ~4x cheaper. Hetzner storage space is also ~1.5x cheaper compared to AWS. If you sign up via this referral link, you’ll receive a 20€ initial credit.
Next select, Create a new key pair, and give it any meaningful name. Press Download Key Pair to save it on your local disk as an RSA type and pem format.
In Network settings, you have to allow inbound SSH traffic.

In Configure storage section, I chose 1600GB of gp3 volume type for root volume. At the time of the last update of this post (Jan 2024), Ethereum full node needs ~1400GB of disk space. Check the current space requirements before choosing a disk size. Depending on how long you want to keep the node running, you must leave some threshold for the new blocks. The current growth rate for full nodes is at ~50GB/month.
AWS charges ~$0.08/GB for EBS disk storage. It means that you’ll pay at least ~$120/month for the Blockchain data storage costs. The previously mentioned Hetzner Cloud is considerably cheaper at ~$0.06/GB resulting in the monthly costs of ~$90.
Once the storage is configured you can now click the Launch instance button.
While the instance is initializing, you have to add more security groups to enable the remaining protocols. You have to allow inbound traffic for TCP and UDP ports 30303 and 9000 because they are needed for P2P discovery and synchronization. Port 30303 should also be exposed for the 0.0.0.0/0 wildcard address. Additionally, if you want to configure external access to the node JSON-RPC API, you’ll have to open TCP ports 80 and 443.
Configuring UFW Firewall for Geth on Ubuntu
If you’re using a different VPS provider, you can use a popular UFW firewall to secure ports. Otherwise, you risk publicly exposing your node RPC endpoint and receiving spam traffic. To open only the necessary points to Geth + Lighthouse on Ubuntu, you have to run the following commands:
sudo apt-get update
sudo apt-get install ufw
sudo apt-get install net-tools
sudo ufw disable
sudo ufw default deny incoming
sudo ufw default allow outgoing
sudo ufw allow 22/tcp # SSH access
sudo ufw allow 30303 # Geth P2P
sudo ufw allow 9000 # Lighthouse P2P
sudo ufw allow 80 # HTTP
sudo ufw allow 443 # HTTPS
sudo ufw enable
Remember to open port 22 because otherwise, you will be permanently locked out of your VPS.
You can check the current UFW config and ports active in the system with these commands:
sudo ufw status verbose
sudo netstat -tlnp
Connect to your VPS
Now back in your terminal, change permissions for your key pair by running:
chmod 400 keypair-ec2.pemNext, go to EC2 > Instances and your new server details page. Copy its Public IPv4 address. Back in your terminal, you can now SSH into your EC2:
ssh [email protected] -i keypair-ec2.pemRunning full post-merge Ethereum node on Ubuntu
Before the Merge, only a single Geth execution client process was necessary to run a full node. Because of the introduction of a new proof of stake instead of a proof of work consensus mechanism, now an additional consensus client process is required. So-called client diversity is critical for the long term security of the network. In this tutorial, I describe how to use a Lighthouse client, which is currently the second most popular after the Prysm client. You can check current consensus client diversity on this website. If Lighthouse becomes too popular, consider using one of the less widespread implementations.
Installing Geth execution client on Ubuntu
Let’s start with the Geth process as a systemd service to run it in the background and enable automatic restarts. Start by running these commands to install Geth from the official repository:
sudo add-apt-repository ppa:ethereum/ethereum
sudo apt-get update
sudo apt-get upgrade
sudo apt-get install ethereum
Now create /lib/systemd/system/geth.service file with the following contents:
[Unit]

Description=Geth Full Node
After=network-online.target
Wants=network-online.target

[Service]

WorkingDirectory=/home/ubuntu
User=ubuntu
ExecStart=/usr/bin/geth --http --http.addr "0.0.0.0" --http.port "8545" --http.corsdomain "*" --http.api personal,eth,net,web3,debug,txpool,admin --authrpc.jwtsecret /tmp/jwtsecret --ws --ws.port 8546 --ws.api eth,net,web3,txpool,debug --ws.origins="*" --metrics --maxpeers 150
Restart=always
RestartSec=5s

[Install]
WantedBy=multi-user.target
Now you can enable and start the Geth service by running:
sudo systemctl enable geth
sudo systemctl start geth
and see the log output using:
sudo journalctl -f -u gethYou should see the following log output complaining about missing consensus client process:
Post-merge network, but no beacon client seen. Please launch one to follow the chain!Installing Lighthouse consensus client on Ubuntu
Let’s fix it by installing a Lighthouse consensus client written in Rust.
wget https://github.com/sigp/lighthouse/releases/download/v4.5.0/lighthouse-v4.5.0-x86_64-unknown-linux-gnu.tar.gz
tar zxvf lighthouse-v4.5.0-x86_64-unknown-linux-gnu.tar.gz
sudo mv lighthouse /usr/local/bin/v4.5.0 with the newest version from the releases page!Now create /lib/systemd/system/lighthouse.service file with the following contents:
[Unit]

Description=Lighthouse consensus client
After=network-online.target
Wants=network-online.target

[Service]

WorkingDirectory=/home/ubuntu
User=ubuntu
ExecStart=/usr/local/bin/lighthouse bn --network mainnet --execution-endpoint http://localhost:8551 --execution-jwt /tmp/jwtsecret --checkpoint-sync-url https://mainnet.checkpoint.sigp.io --disable-deposit-contract-sync
Restart=always
RestartSec=5s

[Install]
WantedBy=multi-user.target
Now enable and start the process:
sudo systemctl enable lighthouse
sudo systemctl start lighthouse
Blockchain synchronization should start now. By querying Lighthouse logs you should see similar contents:
INFO Syncing est_time: 2 days 3 hrs, speed: 28.00 slots/sec, distance: 5141706 slots (102 weeks 0 days), peers: 6, service: slot_notifierOptionally you can omit a --checkpoint-sync-url https://mainnet.checkpoint.sigp.io which would cause your consensus client to sync all the blocks from genesis instead of a community-provided checkpoint. But, during my tests, it took over a week instead of 2 days for the checkpoint sync.

Similar WARN, and ERROR log entries are expected during the sync process.
ERRO Error updating deposit contract cache error: Failed to get remote head and new block ranges: EndpointError(FarBehind), retry_millis: 60000, service: deposit_contract_rpc` - expected error
WARN Not ready for merge info: The execution endpoint is connected and configured, however it is not yet synced, service: slot_notifier`
WARN Beacon client online, but never received consensus updates. Please ensure your beacon client is operational to follow the chain!
As long as you can see regular INFO Syncing logs, the sync is progressing.
Once consensus client finish the sync, Geth will have to process downloaded blocks before it becomes operational. This state will display similar log enteries:
INFO [12-08|21:56:10.074] State sync in progress synced=19.92% state=42.42GiB accounts=39,566,[email protected] slots=161,654,[email protected] codes=186,[email protected] eta=115h25m7.211sInteracting with the Geth execution client
You can verify that the node is up and running by launching a Geth console:
geth attachInside the console, now run:
eth.syncingYou should get a similar output indicating that the node has started the synchronization:
{
  currentBlock: 2254868,
  healedBytecodeBytes: 0,
  healedBytecodes: 0,
  healedTrienodeBytes: 0,
  healedTrienodes: 0,
  healingBytecode: 0,
  healingTrienodes: 0,
  highestBlock: 14426316,
  startingBlock: 2250487,
  syncedAccountBytes: 2670602107,
  syncedAccounts: 11057974,
  syncedBytecodeBytes: 257393098,
  syncedBytecodes: 50954,
  syncedStorage: 42499504,
  syncedStorageBytes: 9161595917
}
If you’re getting false, you should wait for a minute or two for synchronization to kick off (or more if Lighthouse did not finish the initial sync yet). In case you have any issues with completing the synchronization, you can run:
sudo journalctl -f -u gethto tail the log output. Optionally, you can run the geth process with --verbosity 5 flag to increase logs granularity.
A few hours after the node has finished synchronization, it should be discoverable on ethernodes.org. You can double-check that you’ve correctly opened all the necessary ports by going to the geth attach console and running:
admin.peers.map((el) => el.network.inbound)You should see both true and false values meaning that your node is discoverable in the P2P network. If you’re seeing only false, you probably did not publicly expose the TCP and UDP port 30303.
The initial synchronization time depends on the hardware configuration (more details later). You can check if our node is fully synchronized by going to the geth console and running:
eth.blockNumberand compare the value with an external data source, e.g., Etherscan. You can check out official Geth docs for more info on available API methods.
If you’re getting 0 then check your logs for similar entries:
State heal in progressTheir presence means that your node got out of sync and might need a few hours to catch up. If the issue does not fix itself after 10+ hours, your server probably lacks CPU, memory, or disk throughput.
Running light Ethereum node after the Merge
Light node, compared to the full node used to be well a lightweight way to run a blockchain gateway. Before the Merge, it was possible to spin up a light Geth node on a free tier AWS t2.micro instance. One caveat was that light nodes were dependent on full nodes to provide them with up-to-date block data voluntarily. Currently, after the Merge, light nodes are no longer supported, but there’s a work in progress to reenable them in the future.
Password protected HTTPS access to full Geth node with NGINX
Each console method has its JSON-RPC equivalent. You can check the current block number with HTTP API by running the following cURL command:
curl -X POST http://127.0.0.1:8545 \
-H "Content-Type: application/json" \
--data '{"jsonrpc":"2.0", "method":"eth_blockNumber", "id":1}'
But right now, you can only talk to the node from inside the EC2 instance. Let’s see how we can safely expose the API to public by adding by proxing JSON-RPC traffic with NGINX.
You’ll need a domain to implement this solution. It can be a root domain or a subdomain. You have to add an A DNS record pointing to the IP of your EC2 instance. It is recommended to use an Elastic IP address so that the address would not change if you have to change the instance configuration.
Next, inside the instance, you have to install the necessary packages:
sudo apt-get install nginx apache2-utils
sudo apt-get install python3-certbot-nginx
You can now generate an SSL certificate and initial NGINX configuration by running:
sudo certbot --nginx -d example.comTo automatically renew your certificate add this line to /etc/crontab file:
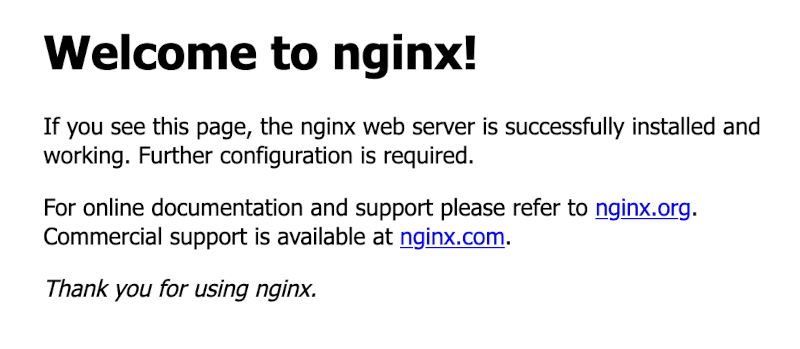
@monthly root certbot -q renewOnce you complete these steps, you should see an NGINX welcome screen on your domain:

Next generate a HTTP basic authentication user and password:
sudo htpasswd -c /etc/nginx/htpasswd.users your_userNow you need to edit the NGINX configuration file /etc/nginx/sites-enabled/default:
server {
    server_name example.com;

    location / {
        if ($request_method = OPTIONS) {
            add_header Content-Length 0;
            add_header Content-Type text/plain;
            add_header Access-Control-Allow-Methods "GET, POST, PUT, DELETE, OPTIONS";
            add_header Access-Control-Allow-Origin $http_origin;
            add_header Access-Control-Allow-Headers "Authorization, Content-Type";
            add_header Access-Control-Allow-Credentials true;
            return 200;
        }

        auth_basic "Restricted Access";
        auth_basic_user_file /etc/nginx/htpasswd.users;
        proxy_pass http://localhost:8545;
        proxy_http_version 1.1;
        proxy_set_header Upgrade $http_upgrade;
        proxy_set_header Connection 'upgrade';
        proxy_cache_bypass $http_upgrade;
    }

    listen [::]:443 ssl ipv6only=on;
    listen 443 ssl;
    ssl_certificate /etc/letsencrypt/live/example.com/fullchain.pem;
    ssl_certificate_key /etc/letsencrypt/live/example.com/privkey.pem;
    include /etc/letsencrypt/options-ssl-nginx.conf;
    ssl_dhparam /etc/letsencrypt/ssl-dhparams.pem;
}

server {
  if ($host = example.com) {
      return 301 https://$host$request_uri;
  }

  listen 80 ;
  listen [::]:80 ;
  server_name example.com;
  return 404;
}certbot commandWe use a proxy_pass directive to proxy traffic from an encrypted 443 HTTPS port to Geth node port 8545 on our EC2 instance without exposing it publicly. Additionally, HTTP basic authentication headers are required for every request.
Now verify that the config is correct:
sudo nginx -tand restart the NGINX process to apply changes:
sudo service nginx restartThe default welcome page should no longer be accessible. You can check if your full node is available via a secure HTTPS connection using this command executed from outside of your EC2:
curl -X POST https://example.com \
  -H "Content-Type: application/json" \
  -u your_user:your_password \
  --data '{"jsonrpc":"2.0", "method":"eth_blockNumber", "id": 1}'
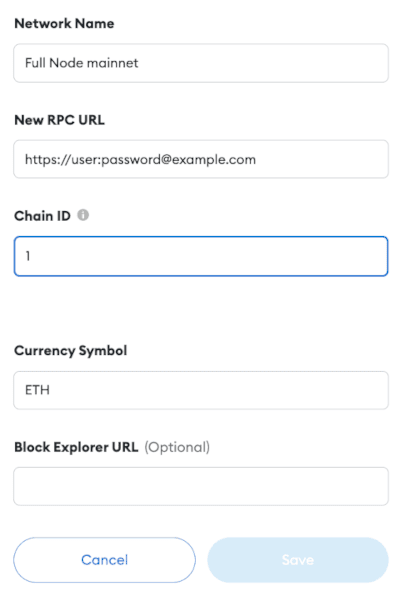
Once you have it working, you can now connect your browser Metamask extension to use your personal full node for blockchain access. To do it go to Metamask Settings > Networks > Add a network. Give your network any name, and in the New RPC URL, input your full node connection URL in the following format:
https://user:[email protected]
Input ETH for Currency Symbol. Chain ID should be auto-filled to 1, representing the Ethereum Mainnet. You can now click Save and use your Metamask wallet as you would normally. You’re now talking directly to the Ethereum blockchain without a trusted 3rd party like Infura or Alchemy. And if AWS is still too centralized for your blockchain needs, remember that you can use a similar setup on your proprietary hardware.
How to enable WSS WebSockets for Geth via Nginx proxy?
WebSockets is an alternative to HTTP-based transport protocol. Compared to the standard HTTP Geth RPC, WebSockets offer additional features, e.g., subscribing to events or observing the stream of pending mempool transactions. We’ve already enabled web sockets on our geth node by specifying the following config:
--ws --ws.port 8546 --ws.api eth,net,web3,txpool,debug --ws.origins="*"But, right now, your WS RPC endpoint is available only locally on URL ws://localhost:8546. To expose it to the outside world with the HTTP basic authentication, you have to add the following NGINX directive:
    location /ws {
        proxy_http_version 1.1;
        auth_basic "Restricted Access";
        auth_basic_user_file /etc/nginx/htpasswd.users;
        proxy_set_header Upgrade $http_upgrade;
        proxy_set_header Connection "upgrade";
        proxy_set_header X-Real-IP $remote_addr;
        proxy_set_header X-Forwarded-For $proxy_add_x_forwarded_for;
        proxy_set_header Host $http_host;
        proxy_set_header X-NginX-Proxy true;
        proxy_pass  http://127.0.0.1:8546/;
    }
Since we’ve already configured SSL termination, you can now connect to your node via secure WebSockets using the URL wss://your_user:[email protected]/ws. Please remember that not all Web3 clients support authentication with credentials encoded directly in the URL so it might require additional client-side config.
Full node hardware requirements
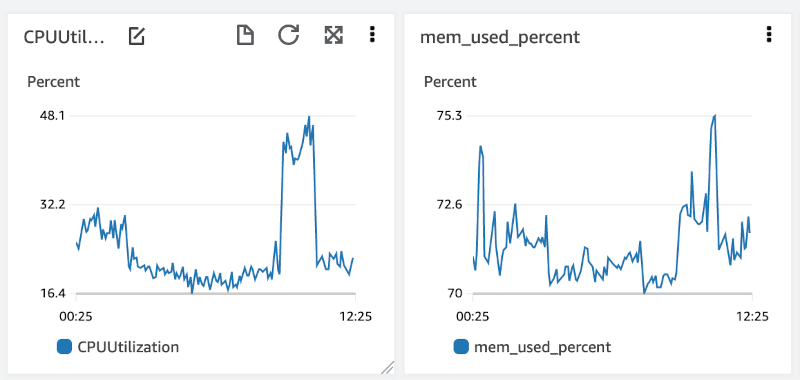
Below you can see graphs showing CPU, and memory utilization of the m5.xlarge (16 GiB RAM, 4 vCPUs) EC2 instance after a full synchronization completed:

16GB of RAM is regularly used up to 70%, so using an 8GB instance will likely cause memory issues. During the synchronization, memory usage was lower at ~50%, but CPU was regularly spiking up to 80%. If you want to speed up the initial synchronization then using CPU-optimized instances like c5.2xlarge could be beneficial.
The choice of hardware depends on how urgently you need the full node up and running. Make sure to avoid using t2/t3 instances. They feature a so-called “burstable” CPU, meaning consistent processor usage above the baseline (between 5% and 40% depending on instance size) would be throttled or incur additional charges.
After the synchronization is finished, Node hardware requirements will be different depending on your use case. If you’re running an arbitrage bot scanning the mempool or thousands of AMM contracts on each block, you’ll need a beefier server than if you occasionally submit a few transactions.
The best way to determine the most cost-effective instance type is to continuously observe the metrics to see if you’re not running out of CPU, memory, or disk IOPS. AWS Cloudwatch makes it easy to configure email alerts when metrics exceed predefined thresholds. Check out these docs for info on how to collect disk and memory usage data because they are not enabled by default.
Summary
Infura and Alchemy are currently industry standard for everyday blockchain interactions. But, knowing that I’ll always be able to access my funds even if the centralized gatekeepers are out of business vastly increase my trust in the Ethereum network. Furthermore, you’ll always be able to host full nodes on similar hardware. Storage space is only about the get cheaper. So the constantly growing size of the blockchain should never be a blocker for regular users to host full nodes and support the network.

