Leaving inbound EC2 SSH ports open greatly increases the risk of unauthorized entities running commands on the server. In the perfect world, each developer with access rights would use only a single static IP address. You could whitelist it in an AWS security group firewall in addition to using standard SSH keys based authentication.
In practice, distributed remote dev teams often need to SSH into the servers from constantly changing IP addresses. In this tutorial, I’ll describe how to grant temporary SSH access for dynamic IP addresses using simple AWS CLI bash scripts.
Your EC2 security group firewall currently whitelists 0.0.0.0/0 for port 22? You’d like to improve the security of this setup without getting lost in AWS complexities? Than this tutorial is for you.
Why not AWS Session Manager?
AWS offers an excellent tool for solving exactly this issue, e.i. granting temporary SSH access rights without opening the SSH ports in security groups.
Unfortunately, it requires you to install additonal software on both server and client, so for some use cases it might not be acceptable. The solution I’d like to propose requires only a standard AWS CLI with minimal permission installed on the client.
Let’s get started.
Check SSH access logs
Before you continue, you might want to check if uninvited guests are knocking on your server’s doors.
Every server instance with publicly facing IP address and opened ports is constantly targeted by malicious network scanning bots. Those bots are usually harmless but they can always start a DDoS attack or discover a vulnerability.
You can check how often your server is targeted by scanner bots by SSHing into it and running these commands:
grep "invalid" /var/log/auth.log
grep "failed" /var/log/auth.log
/var/log/auth.log is the default SSH log file for Ubuntu systemsyou should see the similar output:
Oct 25 07:15:44 : Disconnected from invalid user test 1.2.3.4 port 43401 [preauth]
Oct 25 08:07:33 : Disconnected from invalid user user 1.2.3.4 port 34930 [preauth]
Oct 25 09:20:01 : Disconnected from invalid user admin 1.2.3.4 port 38688 [preauth]
Oct 25 09:53:27 : Disconnected from invalid user guest3 1.2.3.4 port 59294 [preauth]
Bot login attempts are failing in the preauth phase because they are using passwords, and your server is configured only to accept public/private key based logins.
If you’ve enabled password authentication to your server by adding this line to /etc/ssh/sshd_config file:
PasswordAuthentication yesyou could also see a similar output:
Oct 25 10:06:19 : Failed password for ubuntu from 1.2.3.4 port 50703 ssh2
Oct 25 10:22:32 : Failed password for admin from 1.2.3.4 port 50703 ssh2
Oct 25 10:22:36 : Failed password for user from 1.2.3.4 port 50703 ssh2
Unless absolutely necessary enabling password-based login should be avoided.
If you don’t see any output, looks like your server if currently not targeted. It was not the case for my AWS EC2 instances. All of them started receiving unwanted visitors just minutes after provisioning.
Completing this tutorial will permanently cut off all the scanner bots, and other unauthorized access attempts to your server.
Prequisities
The rest of this tutorial assumes that you already have a running EC2 instance on public IP with SSH access for your user.
Also make sure to install the AWS CLI before continuing.
Now you should remove all the security groups rules that allow connection to your EC2 instance with SSH port 22. Confirm that you can no longer connect by running this command:
ssh -o ConnectTimeout=5 -v [email protected]ubuntu and 123.123.123.123 with the public IP and user of your EC2 server.It should fail with the following output:
debug1: Connecting to 123.123.123.123 [123.123.123.123] port 22.
debug1: connect to address 123.123.123.123 port 22: Operation timed out
ssh: connect to host 123.123.123.123 port 22: Operation timed out
If you managed to connect, it means that there’s still some security group whitelisting inbound connections on port 22, so make sure to remove it before continuing.
Setup ephemeral security group firewall and IAM user
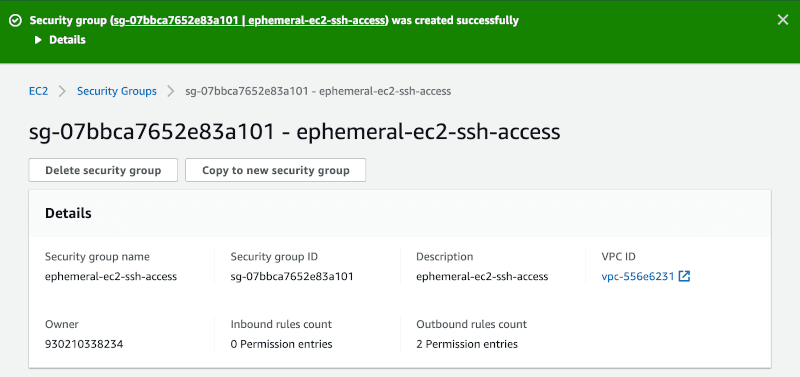
In EC2 section of AWS console go to Security groups and click Create security group. You can name the new group ephemeral-ec2-ssh-access, and assign it to the same VPC as your EC2 instance. Don’t add any inbound rules.

Now go to Instances, select your EC2 instance, click Actions > Networking > Change Security Groups and assign your newly created ephemeral-ec2-ssh-access security group.
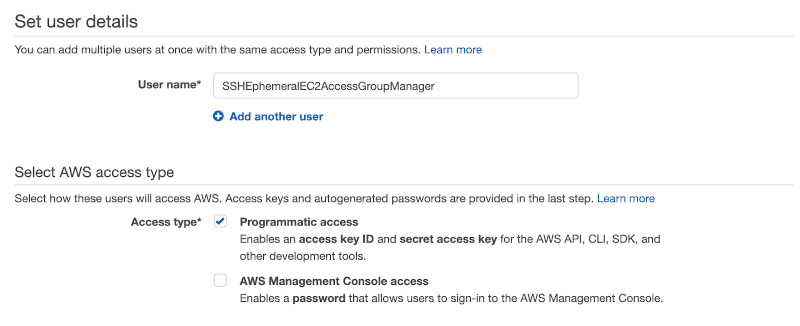
Let’s move on to creating an IAM user now. Go to IAM section and click Users > Add user.
You can call it whatever you want, e.g., SSHEphemeralEC2AccessGroupManager.

Programmatic accessComplete the user creating wizard without granting him any policies and write down Access key ID and Secret access key .
Now go to the newly created user details and click Add inline policy. Select JSON policy format and paste the following content:
{
    "Version": "2012-10-17",
    "Statement": [
        {
            "Effect": "Allow",
            "Action": [
                "ec2:AuthorizeSecurityGroupIngress",
                "ec2:RevokeSecurityGroupIngress"
            ],
            "Resource": [
                "arn:aws:ec2:[REGION]:[ACCOUNT_NUMBER]:security-group/[SECURITY_GROUP_ID]"
            ]
        }
    ]
}
You have to replace:
REGION with the code of your AWS region, e.g., us-west-1 for North California.
ACCOUNT_NUMBER is your AWS account ID. You can find it in My account tab e.g. 123123123123.
SECURITY_GROUP_ID is the ID of the ephemeral-ec2-ssh-access security group you just created e.g. sg-07bbca7652e83a101.
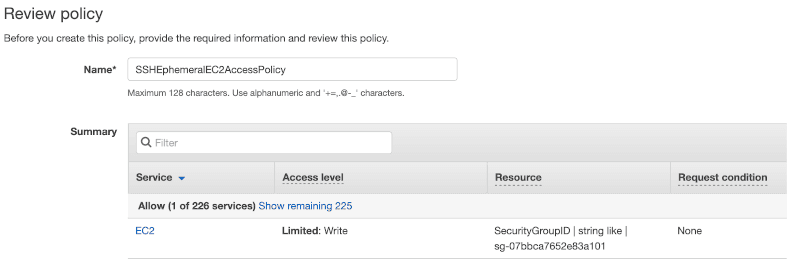
If your JSON correct in the policy review screen you should see the Summary mentioning your security group displayed:

If you can see a warning that policy does not grant any permissions than double-check your region, account number, and security group ID.

So much for clicking in the AWS UI. The rest of the setup can be done straight from the terminal.
Configure AWS CLI scripts
One more thing we need to do is to write two simple bash scripts, literally:
bin/open_ssh
and
bin/close_ssh
Running them will toggle the inbound rule in ephemeral-ec2-ssh-access security group for your current IP address and port 22.
I usually add those scripts in bin directory of each of my projects. Every project has a separate security group and IAM user assigned.
Let’s start by configuring your AWS CLI with the profile:
aws configure --profile your-profile-nameYou need to provide correct access credentials for your new SSHEphemeralEC2AccessGroupManager IAM user.
Now add the scripts doing the actual opening and closing of SSH ports:
bin/open_ssh
#!/bin/sh

WHITELISTED_IP=$(curl https://ifconfig.me 2> /dev/null)

echo "Opening SSH for ${WHITELISTED_IP}"

aws ec2 authorize-security-group-ingress \
--profile your-profile-name \
--group-name ephemeral-ec2-ssh-access \
--region us-west-1 --protocol tcp --port 22 \
--cidr "${WHITELISTED_IP}/32" 2> /dev/null
bin/close_ssh
#!/bin/sh

WHITELISTED_IP=$(curl https://ifconfig.me 2> /dev/null)

echo "Closing SSH for ${WHITELISTED_IP}"

aws ec2 revoke-security-group-ingress \
--profile your-profile-name \
--group-name ephemeral-ec2-ssh-access \
--region us-west-1 --protocol tcp --port 22 \
--cidr "${WHITELISTED_IP}/32" 2> /dev/nullus-west-1 with the code of your AWS regionThat’s it! Now execute your script and confirm that you can SSH into your server:
bin/open_ssh
ssh [email protected]
If you have trouble getting it to work, you can remove silencing the output of aws command (2> /dev/null) to help you debug. AWS CLI error messages are usually quite descriptive.
Inbound SSH port is now opened for your IP. Even if you forget to run bin/close_ssh, no other IP address can access your EC2. It’s an additional security factor, so the correct SSH keys are still necessary. The risk of sometimes leaving the port open for a single IP is negligible. The potential attacker would first have to access the same IP as you. You should be safe, unless your next-door neighbor is up to something.
Automate toggling SSH access
You can wrap your common server tasks in those open/close scripts. I do it for deploys and console access of my Rails side project Abot for Slack that’s hosted with Dokku.
bin/prod_deploy
#!/bin/sh

bin/open_ssh
git push dokku master
bin/close_ssh
bin/rails_console
#!/bin/sh

bin/open_ssh
dokku --rm run rails c
bin/close_ssh
I use this approach as a one-man team, but it should scale for more developers working on the same project. Each team member could use his ephemeral security group managed by a separate IAM user.
Summary
The additional security of constantly closed SSH ports hardly affects my workflow. I don’t have to use VPN, 2FA, or login into a special bastion host to access the production system securely. It’s just the good ol’ SSH and two simple scripts. Once configured, they are barely noticeable but guarantee to keep the bad guys out.
This approach might not grant your project the PCI compliance certificate, but should be good enough for many use cases.


