Installing or updating an app (ahem, ahem XCode…) on macOS is sometimes surprisingly difficult because of missing disk space. In this blog post, I’ll describe various ways to quickly and safely clean vast amounts of storage on a Mac Book used for web development.
I’ve recently performed the same analysis and cleanup on my MacBook Pro. As a result, I’ve managed to free tens of GBs of storage and could finally update XCode to the newest version.
Analyze your disk usage
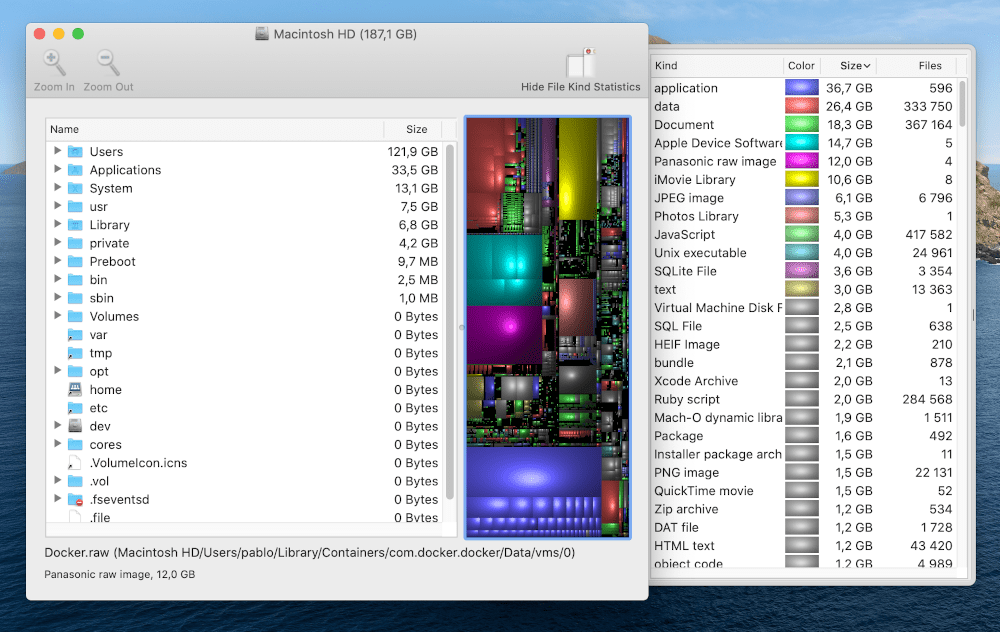
The best way to identify where the bulk of your storage space is allocated is to use Disk Inventory X application. On macOS, the simplest way to install it is to use the Homebrew Cask.
brew install --cask disk-inventory-xThe program offers straightforward UI allowing you to at a glance examine your storage usage:

Let’s now discuss the lowest hanging fruits in reducing storage usage.
Remove redundant applications cache
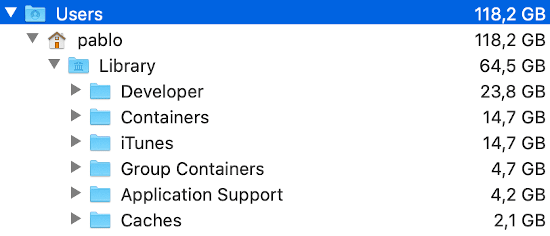
On my computer the significant bulk of unnecessary data was in the ~/Library/Caches folder. I’ve noticed hundreds of MBs related to Yarn that I did not use for a year or so. Apparently, many applications are keen to cache data while neglecting to do the cleanup afterward.

You can thoroughly purge the cache using the following commands:
cd ~/Library/Caches
rm -rf *
Alternatively, you can cherry-pick which cache folders to remove. I’ve been regularly doing the total cache cleanups for a couple of months now. Other than the temporary system slowdown, I did not notice any issues.
Obviously, the cache will rebuild itself over time. But it does not grow to the same size even after a more extended period. After removing over 30GB of cache, the Caches folder size increased to only around 2GB after the week of regularly using the computer.

Remove old log files
I work mostly with Ruby on Rails on my desktop. While using Disk Inventory X, I’ve discovered that running the local tests continuously appends content to the log/test.log file.

I can imagine other stacks similarly silently consuming the disk space. Disk Inventory X is invaluable in identifying and fixing such cases.
Reduce Docker disk space usage

Docker has a bad reputation for devouring large amounts of disk space. You can check how much of your disk space Docker has acquired so far by running:
docker system df

TYPE            TOTAL     ACTIVE    SIZE      RECLAIMABLE
Images          17        4         2.115GB   1.577GB (74%)
Containers      6         1         138.4MB   0B (0%)
Local Volumes   19        5         1.564GB   1.347GB (86%)
Build Cache     0         0         0B        0B
Now run docker images to see which images are taking up most of the disk space:
docker images

REPOSITORY     TAG          IMAGE ID      CREATED        SIZE
pihole/pihole  latest       4642d275ab73  4 months ago   296MB
postgres       11.8-alpine  a7f73db0b977  6 months ago   156MB
postgres       12.3-alpine  17150f4321a3  6 months ago   157MB
postgres       9.6-alpine   45f463e53bc1  6 months ago   36.1MB
alpine         latest       a24bb4013296  7 months ago   5.57MB
postgres       12.2-alpine  ae192c4d3ada  8 months ago   152MB
postgres       9.6.17       529a7b20fb73  8 months ago   200MB
postgres       11.6-alpine  89ae06c2ad76  11 months ago  152MB
On my computer, I’ve had various versions of the postgres image, each taking a considerable amount of space. You can remove the Docker image by running the following command:
docker rmi -f IMAGE_IDFrom my experience, images usually take most of the disk space. However, if you’d like to do a more global cleanup including Docker containers, networks, volumes, and cache, use this command:
docker system prune --volumesThe total cleanup works for me because all my local Docker projects can be easily recreated using seed data. Make sure to double-check if you don’t have data that will be difficult to recover before removing a container or a volume.
Check out the Docker documentation to read more about other pruning commands.
A honorable mention - node_modules
A blog post about missing disk space would not be complete without dedicating a paragraph to everyone’s beloved node_modules. Just a few modern JavaScript projects developed locally could easily consume tens of GBs of disk space.
You can use this command to list all the top-level node_modules folders together with their corresponding size:
find . -name "node_modules" -type d -prune -exec du -sh '{}' +If you don’t feel like cherry-picking which bloated dependencies to destroy, you can run the following command to get rid of them all:
find . -name "node_modules" -type d -prune -exec rm -rf '{}' +Just watch out if you’re running it in a top-level (i.e., home) folder because it might remove some necessary system-level dependencies. But as long as you run it in your own ~/Programming folder it shouldn’t do any damage.
Summary
I hope those tips will help you to clean the vast amounts of disk space easily. Regularly checking the Disk Inventory X for unnecessary disk usage bloats is the a good practice that will help you keep your disk usage in order.

