I’ve used to recommend Google AMP pages as a reliable way to increase site SEO rating, organic traffic and performance. Recently I’ve removed AMP from my website. In this blog post, I will describe how it affected my blog and a couple of more advanced web performance optimization techniques I am using instead of a proprietary standard like Accelerated Mobile Pages.

Removing AMP
How to do it
I will not elaborate on why I decided to remove AMP from this blog. Long story short they offered a degraded experience to mobile visitors and enforced too many restrictions. You can check out Hacker News to find all the AMP hate you could think of.
Removing AMP from your website is not instant and has to be performed with care not to mess anything up.
You have to start with configuring a redirect from an AMP version of the page to the standard one. In my case it was done using a simple NGINX directive:
  location ~ ^/amp/(.*)$ {
    return 301 /$1;
  }
When it’s working you can remove rel="amphtml" and request reindexing in Google Search console.

SEO and organic traffic results of removing AMP
AMP pages have been gone from my blog for around one month at the time of writing this post. It should be enough time to see some effects on traffic.
I did not notice a negative impact on SERP position and organic traffic numbers.

Maybe for a blog publishing new article every week or so potential top carousel placement makes little difference.
Let me describe a couple of changes I introduced to this blog to offer its visitors equally smooth and pleasant browsing experience as the one advertised by AMP supporters.
Prefetch web pages for an instant browsing experience
AMP are known for offering instant responsiveness. You can implement a similar user experience on your website using good ol’ HTML tags.
Every post on this blog links to the previous and next one. I use the following link tags to preload HTML contents of the neighboring posts:
<link rel="prefetch" href="/previous-post-url">
<link rel="prefetch" href="/next-post-url">
Each HTML page weights around ~10kb so even on mobile devices it is a negligible bandwidth overhead.
On the home page with a paginated index of all my posts I preload two first articles by default. If a user starts scrolling down, I dynamically preload blog posts when their title links become visible in the viewport and could potentially be clicked. It can be accomplished by using a bit of vanilla JS mixed with Jekyll templating:
(function () {
  var urls = [...] // URLs loaded using Jekyll templating
  var preloadedUrls = []

  preloadedUrls.push(urls[0])
  preloadedUrls.push(urls[1])

  var preload = function(url) {
    if(url === undefined) {
      return;
    }

    if(preloadedUrls.includes(url)) {
      return;
    }

    var preloadLink = document.createElement("link");
    preloadLink.setAttribute("rel", "prefetch");
    preloadLink.setAttribute("href", url);
    document.getElementsByTagName("head")[0].appendChild(preloadLink);
    preloadedUrls.push(url);
  }

  window.onscroll = function() {
    var preloadIndex = parseInt(window.scrollY / 300)
    preload(urls[preloadIndex]);
  }
})();
I’ve noticed that preloading works reliably on Chrome desktop and Android mobile browsers. It offers an instant navigation experience even when a connection is bad. Unfortunately, it does not seem affect iPhone, desktop Safari or Firefox. Chrome is the most popular browser, so it is a nice win anyway.
Testing mobile user experience
If you are on a high-speed WIFI, you might not notice improvement offered by preloading. You might think that your website is fast if you only ever access it on a desktop computer. Nowadays the bulk of traffic is mobile devices, and a website developer should focus on offering the best browsing experience for them in particular.
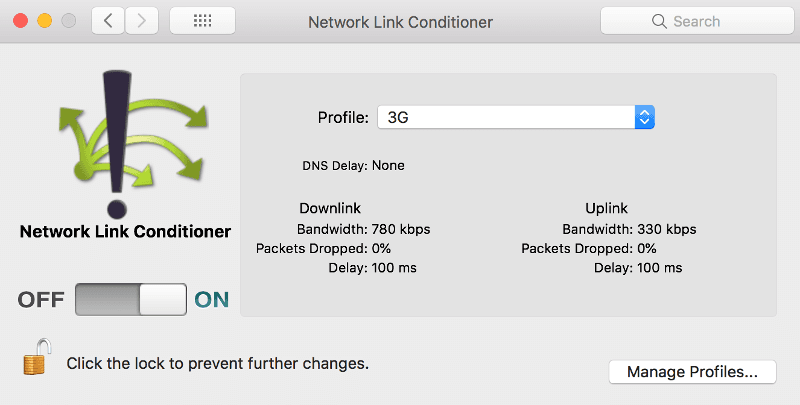
I use Network Link Conditioner to check how my websites work in bad network conditions:
Setup HSTS
With tools like Let’s Encrypt and Cloudflare offering free SSL/TLS certificates there is no reason why any part of your website should be served via plain HTTP.
Adding an HSTS (HTTP Strict Transport Security) header is a simple way to avoid unnecessary server-side redirects when a user enters the URL of your website directly into the browser.
Without an HSTS header redirect will be done using 301 HTTP code, redirecting HTTP version to HTTPS. If you have HSTS header in place, a redirect will be done on a client-side reducing one full network roundtrip and therefore improving the initial user experience.
Additionally, you can submit your website to HSTS Preload List so that visitors are redirected to HTTPS version by default, even if they did not yet visit your website before.
Make sure to carefully read about the implications of adding HSTS header, because it is a one-way trip and cannot be reverted.
Cache everything with Cloudflare CDN
I use Cloudflare as a CDN for this blog. By default, it caches only static resources.
In that case every visitor would have to download an HTML website from the VPS server located in the US. It means a full network roundtrip all the way to the US, regardless of their geographical location just to see anything rendered on a screen.
This blog is a static website so a simple Cloudflare configuration tweak can significantly improve web performance. Using so-called Page Rules you can configure Cloudflare to cache everything including your HTML pages respecting their corresponding cache expiry headers.


To make it work I use the following NGINX configuration:
  location ~* \.(?:ico|css|js|gif|jpe?g|png)$ {
    expires 8d;
    add_header Cache-Control "public";
    try_files $uri =404;
  }

  error_page 404 /404.html;
  location / {
    expires 15m;
    add_header Cache-Control "public";
    try_files $uri $uri.html $uri/ =404;
  }
I can cache static resources for 8 days to make Google Page Insights happy. I use jekyll-assets for adding md5 digest to filename based on contents, so stale cache is not a problem.
After each deploy I run the following Ruby script which purges Cloudflare caches for static HTML pages:
require 'sitemap-parser'
require 'http'

response =  HTTP.headers(
  "X-Auth-Email" => ENV.fetch("CLOUDFLARE_EMAIL"),
  "X-Auth-Key" => ENV.fetch("CLOUDFLARE_API_KEY"),
  "Content-Type" => "application/json"
).post(
  "https://api.cloudflare.com/client/v4/zones/#{ENV.fetch('CLOUDFLARE_ZONE_ID')}/purge_cache",
  json: {
    files: SitemapParser.new("./docs/sitemap.xml").to_a
  }
)
It means that every visitor will keep a copy of HTML pages in his local cache for max 15 minutes and after that request an up to date version from Cloudflare CDN server node.
Server geographical location
It might be less critical in the case of an entirely static website. Reducing network roundtrip distance is crucial if your website’s content is dynamic.

I’ve recently migrated the VPS server of my side project Abot Slack Bot to the US. While Abot users are scattered all over the world, the bot itself connects to Slack API US-based servers for every single command. Shortening backend side network roundtrips distance considerably improved response times.
Cloudflare’s Argo routing
Cloudflare’s Argo routing is a DNS level optimization. Compared to other tips this one comes at a price, but in my opinion it’s totally worth it. Let me show you the response time stats for this blog measured with updown.io before and after enabling Argo:
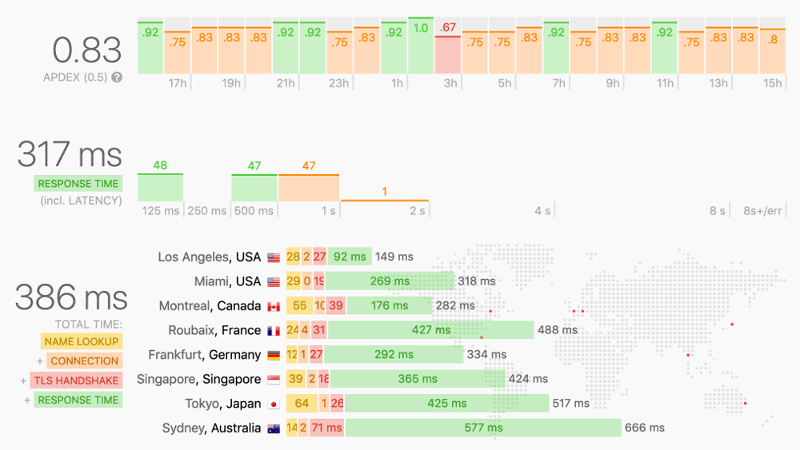
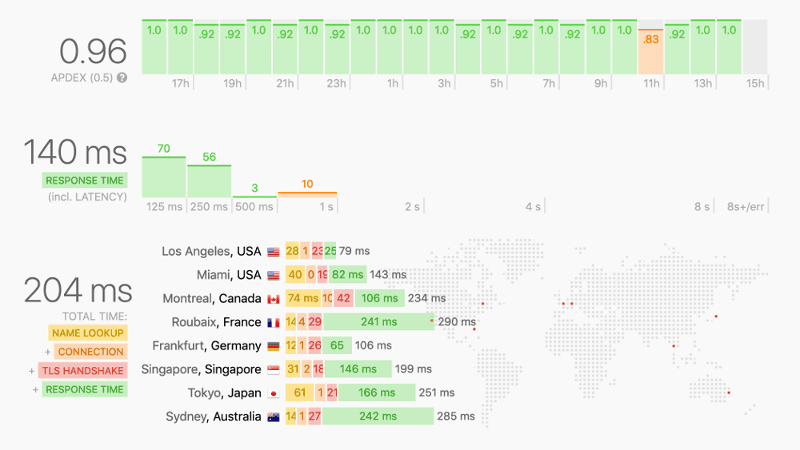
As you can see with Argo on this site is ~100% faster, even more in locations farther away from the US based server. Not bad as for one click of a button.
Optimize images loading experience
Display placeholder
I add an image at the top of every blog post. On slower networks, high-quality image version could take a significant time to load and spoil the experience.
If you know the ratio of your images you can use a simple CSS trick to prevent your surrounding content from “jumping” when an image is finally loaded:
<div class="main-image-placeholder">
  <img src="/images/image.jpg">
</div>
.main-image-placeholder {
position: relative;
padding-bottom: 61%; /* ratio of image height to width */
height: 0;
overflow: hidden;
color: #eee;
background-color: #eee;
}
.main-image-placeholder img {
position: absolute;
top: 0;
left: 0;
width: 100%;
}It will display an empty grey placeholder with the correct size regardless of visitor’s viewport before the image is loaded.
Preload low-resolution version
Another optimization you can apply is to display a low-resolution version of an image before original version is downloaded. This can be accomplished with a bit of vanilla JavaScript code.
  (function() {
    Array.prototype.slice.call(
      document.getElementsByClassName('js-async-img')
    ).forEach(function(asyncImgNode) {
      var fullImg = new Image()
      fullImg.src = asyncImgNode.dataset.src;
      fullImg.onload = function() {
        asyncImgNode.classList.remove('js-async-img')
        asyncImgNode.src = asyncImgNode.dataset.src
      };
    });
  })();
Corresponding HTML img node:
<img
  class="js-async-img"
  data-src="https://example.com/assets/high-res-image.png"
  src="https://example.com/assets/low-res-image.png"
>
Reconsider dependencies
Overdosing externally hosted 3rd party JavaScript libraries is the simplest way to kill the performance of your website. AMP standard does not let you include them at all. I would like to propose a middle ground approach.
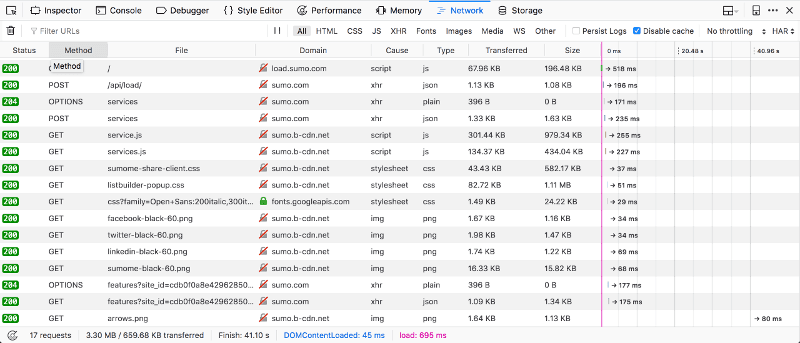
Dropping in yet another <script src="..."> might not seem like a big deal. It’s easy to forget that one script tag can result in a cascade of request each including more scripts and resources. Let’s look at the cost of embedding sample 3rd party JavaScript libraries:
| Requests | Bandwidth (total/gzipped) | |
|---|---|---|
| Google Analytics | 4 | 104.09 KB / 40.37 KB |
| Twitter button | 8 | 173.68 KB / 59.30 KB |
| Disqus | 26 | 862.55 KB / 271.48 KB |
| Crisp Chat | 7 | 936.54 KB / 141.43 KB |
| SUMO | 16 | 3.30 MB / 657.17 KB |
As you can see SUMO is surprisingly heavy. I was using it for a while because I really liked their responsive social share plugin. Later I reimplemented it from scratch.

In the end, I decided that Disqus is the only heavyweight 3rd party JavaScript library that offers enough value to embed it on this blog. Maybe if I were using SUMO fullscreen subscription popups and other conversion tools, it would make sense to add those 3 MB of bandwidth.
[Update] I’ve migrated my comments system to lightweight Commento.
Value vs. price
My point is that it’s very easy to overlook what is the performance price of including JavaScript dependencies, and therefore spoiling the user’s browsing experience.
I think it goes down to how much value a tool offers compared to cost in requests and bandwidth. For example, I decided to embed Crisp Chat on the Abot landing page. On-site chat support improves the Abot users/customers experience a lot and does not cost much in terms of performance.
To contrary 8 additional requests and almost 200 kb for an interactive Twitter follow button does not seem like a good tradeoff.
Quick Disqus tip
Make sure to disable cookies tracking and affiliate links in Disqus admin panel to reduce the number of requests it makes:

Summary
I don’t think that shaving a couple hundred milliseconds off website loading time can make or break your internet business but too many websites are bloated with unnecessary JavaScript and resources. Offering your users a smoother browsing experience could be a competitive advantage.
I implemented all the optimizations I described above in my Jekyll SEO template. You can download it for free. It is a standard treat for an email sub deal.
I am still in the process of making this blog as performant as possible. If you notice any improvements that could be applied here please leave a comment. BTW I can highly recommend reading High Performance Browser Networking by Ilya Grigorik which was an inspiration for many of the optimizations I write about. You can also check out my previous post for more SEO optimization and web performance tips.
