Storing files on S3 is for many developers, the first contact with AWS cloud. Unfortunately, the “quick and easy” configuration can be insecure. If you are uploading files to an S3 bucket but never configured a custom AWS IAM policy it’s possible that there’s a security issue in your app. In this tutorial, I will describe what IAM policies are and how to securely configure them when working with S3 in the Rails apps.
This tutorial is written in the context of the Ruby on Rails tech stack, but it can be applied to all the backend technologies.
What’s the problem with the default S3 settings?
To upload files to S3 from the Rails app using popular gems like Carrierwave you need to provide AWS Access Key ID and Secret Access Key values. Unfortunately few tutorials mention the security aspects of adding those values to your application.
After creating the new AWS account, you only have the root user access keys available. Using them in your Rails app is a serious security issue and must be avoided. A potential breach would grant an attacker full access to your AWS account.
Even creating a user account with access limited to operating only on S3 resources is risky. With incorrect access scope configured for your Rails app, executing a single line of code (even in the development or test environment) could irreversibly remove all your buckets:
Aws::S3::Client.new.list_buckets.each(&:delete!)sudo rm -rf *In theory, a single AWS account can host asset buckets for multiple apps or additional data like redundant database backups. It means that a single faulty command from any of the connected apps could remove all those buckets.
Read on if you’d like to learn how to minimize this risk using AWS IAM policies.
IAM Policy intro
IAM policies are a mechanism for fine-tuning the AWS user access privileges. They can be a bit overwhelming to start with, but to securely work with S3 buckets, the configuration is pretty straightforward.
Let’s start with creating a new IAM user and granting him an AmazonS3FullAccess policy. It’s kind of like a sudo access to S3, but it will allow me to highlight the differences.
After logging into your AWS console, go to IAM section. Then click on an Add User button. Make sure to select only Programmatic access.

On the next screen, you should choose Attach existing policies directly and select AmazonS3FullAccess policy.

Let’s have a quick look at the selected policy JSON:
{
    "Version": "2012-10-17",
    "Statement": [
        {
            "Effect": "Allow",
            "Action": "s3:*",
            "Resource": "*"
        }
    ]
}
Without going into too much detail, it’s whitelisting all the actions on S3 related resources from your AWS account. Let’s give it a try using the official AWS CLI.
Playing with S3 “sudo” access
First you need to configure the CLI by typing:
aws configureand inputting your IAM user AWS Access Key ID and AWS Secret Access Key. You can just press ENTER when asked to provide Default region name and Default output format.
Now display your current buckets by typing:
aws s3 lsLet’s try to create a new bucket now (remember that bucket names must be unique across all AWS, so make sure to use a different name):
aws s3 mb s3://new-test-bucket --region us-west-1Let’s upload a sample file to the new bucket and check that it’s actually there:
echo "test" > test.txt
aws s3 cp test.txt s3://new-test-bucket
aws s3 ls new-test-bucket
Now let’s try to remove the bucket:
aws s3 rb s3://new-test-bucket --forceAs you can see from the console output, the last command removed the uploaded file and completely destroyed our test bucket. If you mistyped the bucket name, this single line of code could irreversibly remove your production app assets.
For maintenance tasks, a user with AmazonS3FullAccess policy can be handy. I usually make its access keys inactive when they are no longer needed to prevent accidental or malicious misuse.
Now let’s move on to limiting access for our IAM user so that he can only manage assets from a single bucket.
Configuring secure S3 IAM policy
Before we change our user permissions, let’s create another test bucket:
aws s3 mb s3://another-test-bucket --region us-west-1Back in the AWS console UI remove the AmazonS3FullAccess policy from your user. Now running any AWS CLI command will result in the following error:
An error occurred (InvalidAccessKeyId)Now we have to attach a custom IAM policy to our user.
In the Policies tab, you need to click a Create policy button. Choose JSON instead of Visual Editor mode and paste the following JSON code:
{
    "Version": "2012-10-17",
    "Statement": [
        {
            "Effect": "Allow",
            "Action": [
                "s3:ListBucket"
            ],
            "Resource": [
                "arn:aws:s3:::another-test-bucket"
            ]
        },
        {
            "Effect": "Allow",
            "Action": [
                "s3:PutObject",
                "s3:GetObject",
                "s3:DeleteObject",
                "s3:PutObjectAcl"
            ],
            "Resource": [
                "arn:aws:s3:::another-test-bucket/*"
            ]
        }
    ]
}
This policy is a bit more complex than the previous one. You can see that it is listing the S3 assets ARNs (Amazon Resource Names) and actions that a user can perform on them. Above configuration should be appropriate for use cases of typical Rails app.
If your Rails app interacts with multiple buckets, you will have to list their ARNs in the Resource array.
In the next step, you must name your policy. Now you can attach it to your IAM user, just like you did with AmazonS3FullAccess policy.
Let’s give our new policy a try:
aws s3 ls another-test-bucket
aws s3 cp test.txt another-test-bucket
aws s3 rm s3://another-test-bucket/test.txt
As you can see listing the contents of the bucket, adding and removing files from it works. But if you try to remove the bucket:
aws s3 rb s3://another-test-bucket --forceyou will get the following error:
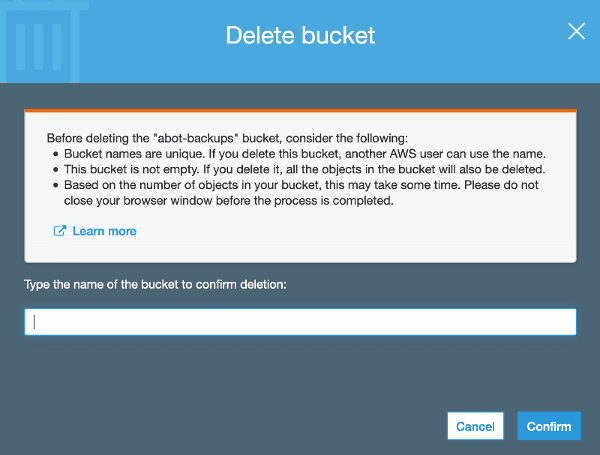
remove_bucket failed: s3://another-test-bucket An error occurred (AccessDenied) when calling the DeleteBucket operation: Access DeniedYou can still remove a bucket via a UI, but it is forcing you to type name of the bucket beforehand minimizing the risk of a fat-fingered command error:

Summary
AWS IAM Policies are a complex topic. Fortunately, you don’t have to become a expert to significantly improve the security of how your Rails app interacts with S3 resources.
I encourage you to analyze the permissions scope of AWS credentials that your Rails app is using. Fine-tuning its access rights can prevent a disastrous security breach.
If you’d like to learn more about the security aspects of working with S3 buckets, you can check out my other tutorial.


